User story Mapping
“User Story Mapping” is a technique used in Agile that helps visualize and plan the development of a product or project as a whole. It consists of a visual map of “user stories,” which are descriptions of the functionalities or features that users want to see in the product.
In User Story Mapping, cards are used to represent epics, features, or characteristics, and user stories. These cards are organized on a board or whiteboard, following a logical flow that reflects the user experience. The goal is to create a visual representation of user stories that aids in understanding how they relate to each other and fit into the project’s context.
The benefits of User Story Mapping include:
- Providing a clear and shared vision of the project for the teams.
- Facilitating the prioritization of user stories, identifying what needs to be developed first.
- Identifying gaps or unmet needs in the project.
- Planning sprints and releases more effectively.
- Being useful for planning releases and communicating project progress to stakeholders.
- Allowing for scalability in agile projects. Scalability in agile refers to the implementation of agile practices in larger projects or companies where multiple teams work together on a larger product or project.
In summary, User Story Mapping is a tool that promotes collaboration, understanding, and planning in agile teams, leading to user-centered software development and effective delivery of features.
How is a User Story Mapping structured?
- Product: The term “product” refers to the software or application in development that will be used by end users.
- Epic: An “epic” is a unit of work representing a high-level functionality or feature in the product, which is often broken down into smaller features. For example, if you’re developing an application, an epic could be “Payment Process.”
- Feature: A “feature” is a specific functionality within an epic. Features are more detailed than epics and represent an identifiable and useful part of the product. Following the previous example, a feature related to the “Payment Process” epic could be “Credit Card Payment.”
- User Story: A user story is a description of a specific functionality from the user’s perspective. They are usually concise and follow a simple format: “As a [user type], I want to [perform an action] to [achieve a goal].” For example, “As a customer, I want to add products to my shopping cart to purchase multiple items at once.

How do I start with User Story Mapping?
Next, we’ll explain step by step how to start with User Story Mapping in DoneTonic:
Step 1: Creating Your First Product
- Start by creating your first product.
- Assign it a name, and, if necessary, a description.
- You can also choose the color that will identify this product, as it will be useful later on.
Step 2: Creating Epics with Their Respective Features
- Continue by creating epics along with their corresponding features.
- Here, you can also assign a color that identifies the epic or the features.
- The priorities of epics and features are managed from right to left, with the elements on the right having higher priority.
Step 3: Adding the Corresponding User Stories
- Add the user stories that correspond to each epic and feature.
- User story priorities are managed from top to bottom, with the user stories at the top having higher priority.

Assigning Work to Your Teams
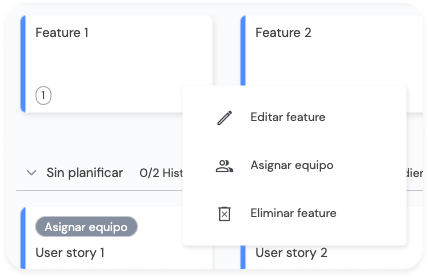
Once you are clear about the work to be done, it’s time to define who will be responsible for it. You can assign an entire epic, a complete feature, or a user story to a specific team by following these steps:
Click on the three-dot button on the element you wish to assign. Select “Assign to Team.”
Once you have completed this work assignment for each team, you will be able to see the user stories represented as PBIs (Product Backlog Items) in the respective backlogs of each team.
It’s important to note that if you assign an epic or a feature to a team, all the user stories contained within these elements will be automatically assigned to the same team.
If you want to assign one of these user stories to another team, you just need to click on the team button and make the change.
Step 5: Creating a Release from the User Story Mapping
Once you have defined what work will be carried out and who will be responsible for it, it is crucial to establish when the work will be delivered. For this purpose, releases are used. You can create a release directly from the User Story Mapping and assign the user stories that will be delivered on the implementation date of that release.
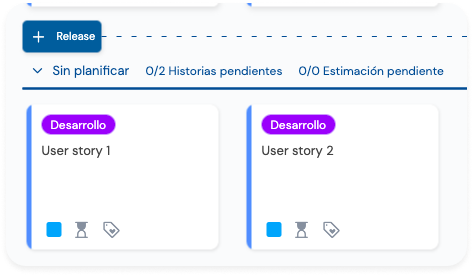
Creating a release is a straightforward process. Follow these steps:
- Go to the “Unplanned” section and click on the button located in the top left corner, labeled “+ Release.”
- Assign a name to the release and specify the estimated delivery date.
- Once created, you can drag the user stories that will be part of this release.
This process allows you to plan and organize your project deliveries, ensuring effective management of time and resources.
User Story/User Story and PBIs:
As mentioned earlier, once you assign a User Story to a Team, it will be reflected as a PBI in the Team’s Backlog. Furthermore, when you start working on the PBI, any changes in its status, estimation, or label will be reflected in the User Story.
View of User Story as a PBI in the Backlog:
The color label on the left indicates which Product this PBI corresponds to, making it easy to visualize your work. The User Story Mapping icon allows you to see which Product, Epic, and Feature this PBI belongs to.

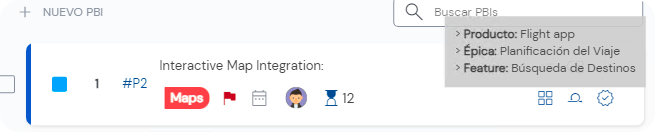
In the event that the situation is reversed, and you want to add a PBI to a User Story Mapping, you can do so by clicking on the User Story Mapping icon of the PBI and specifying in which Epic and Feature you want to place it.
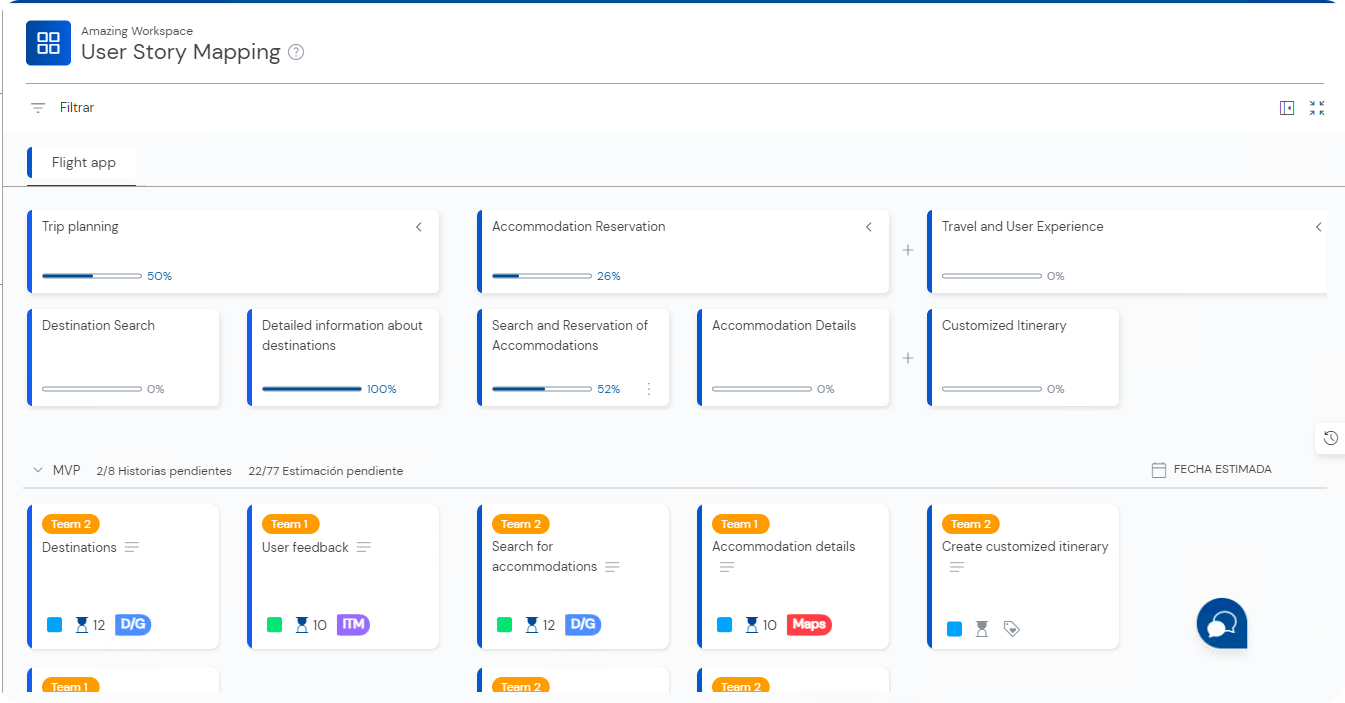
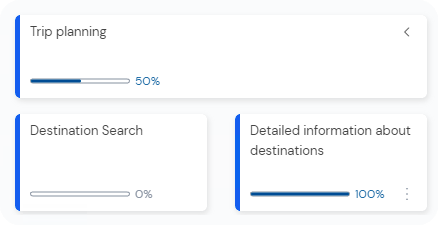
How can I know the status of each epic and each feature?
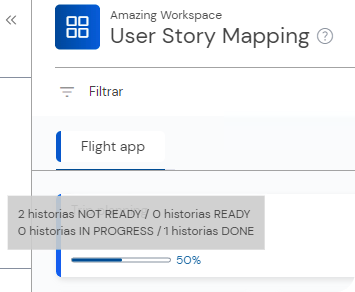
If you want to know how progress is being made on an epic or a feature, you just have to look at its respective progress bar, which indicates how much has been completed and how much is left to finish the epic or feature.
By hovering over the progress bar, you can get detailed information about the states of its user stories.
Now you may wonder how DoneTonic calculates the progress of an epic or a feature. It’s very simple:
Depending on the case, the following parameters are taken into account: Status of the stories and/or estimation of each story:
- If all stories have an estimation, progress is calculated based on the estimation.
- If you don’t work with estimation, progress is calculated based on the status of the stories. Interpreting the stories in DONE as completed.
- If some stories have estimation and others don’t, an average estimation is taken for the non-estimated stories. This is calculated by summing the estimations of all stories and taking an average.
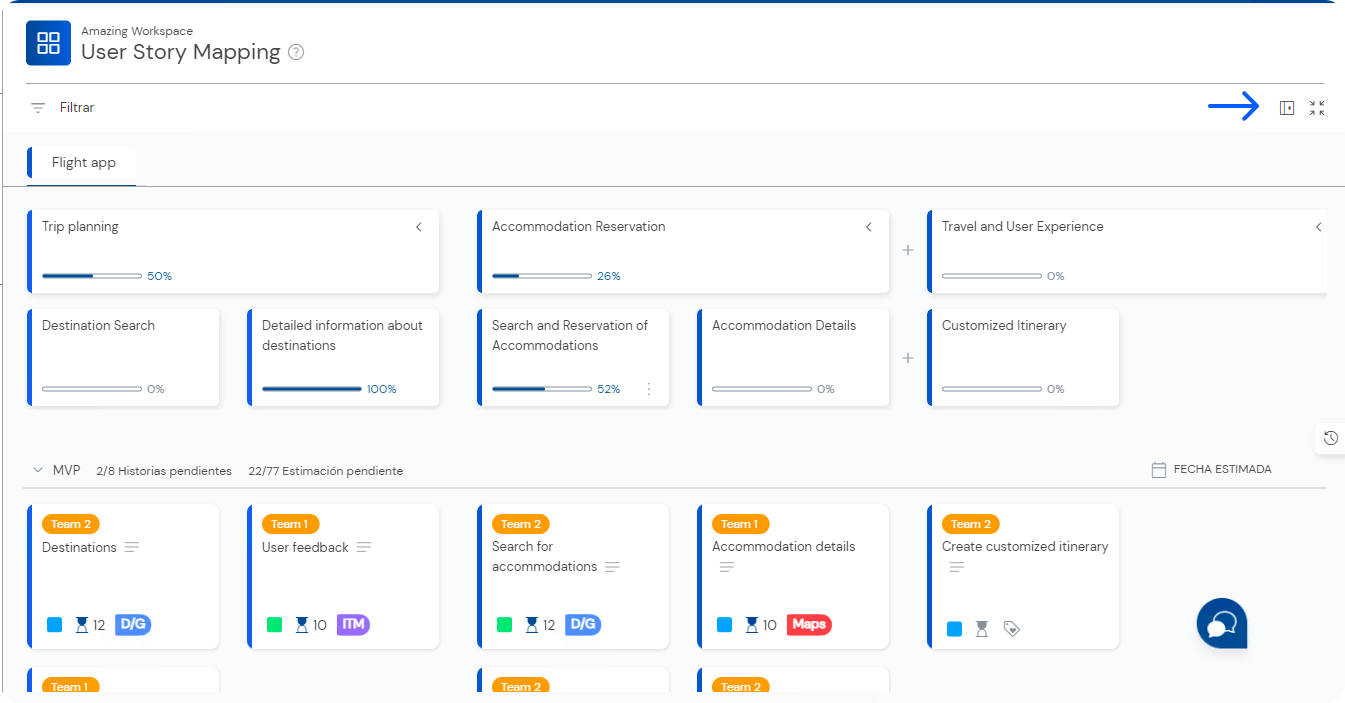
Views in User Story Mapping:
It often happens that the User Story Mapping becomes a very extensive map, and perhaps you want to see the information more condensed.
For this, you have various view options for User Story Mapping. In the top bar on the right, you can:
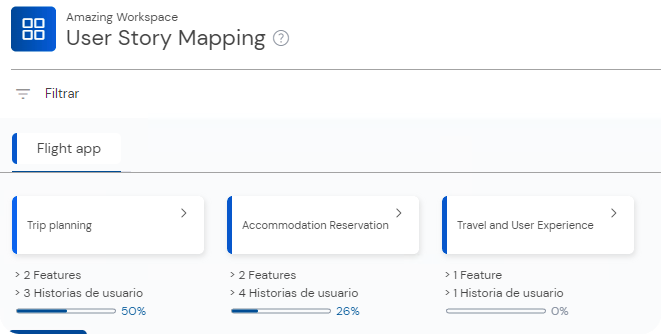
Compact the view: Where the entire map will be compressed, leaving only the titles of the elements visible. Collapse epics: Where all epics will collapse, displaying the progress bar and the number of elements contained in each epic.
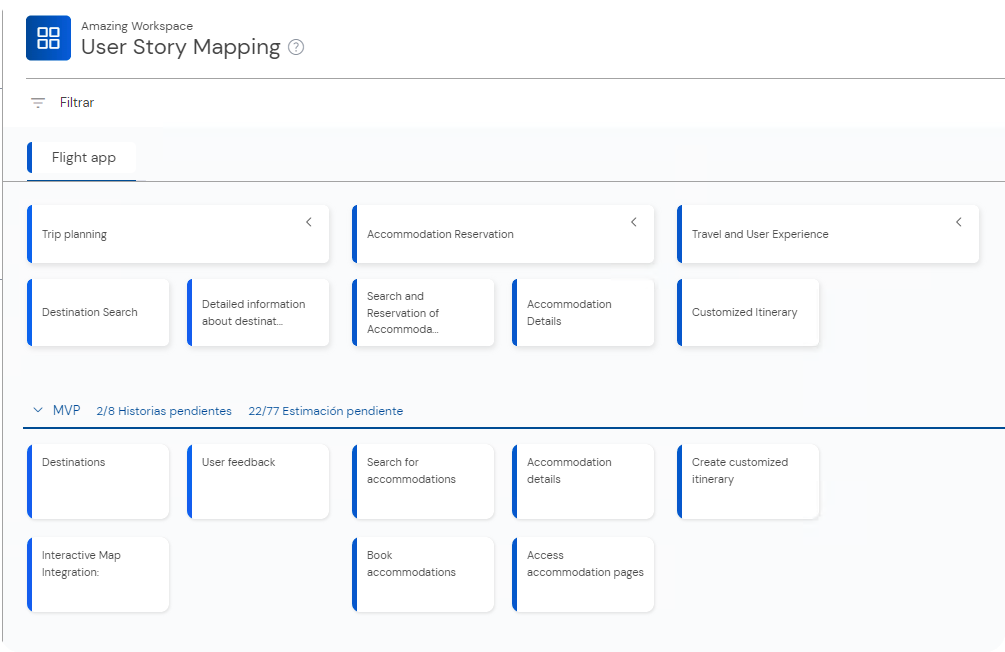
Compacted View:
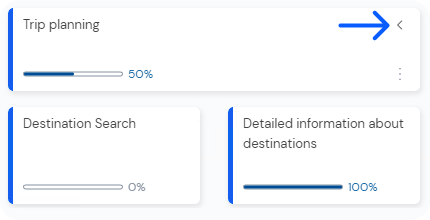
View with collapsed epics:
If you want to collapse only one epic, you have to click on the arrow located in the upper right corner:
View Releases:
Upon completion of a release, it will collapse automatically.
In case you do not wish to visualize completed releases, you have the option to hide releases in the more options menu.
If you later decide to view hidden releases, you just need to click on the Show releases icon in the top right menu.
Converting User Stories into Epics or Features:
Sometimes, a User Story is too large, and you need to handle it as a feature or even as an epic.
If you need to convert the user story into a feature or an epic, you just have to click on the three dots icon of the user story and select “Convert to Epic” or “Convert to Feature”
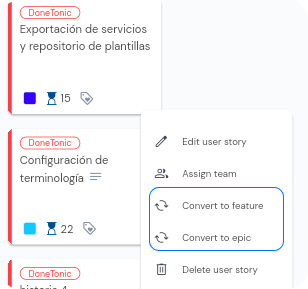
Automatically, Donetonic will convert your user story into the selected item.
If the user story includes a description, is previously assigned to a team, or has attached elements, all these aspects will be transferred to the new item.
If the user story is linked to a PBI (Product Backlog Item) in the team’s backlog, please note that when converting it into an epic or feature, this PBI will be removed from the backlog. Afterwards, it will be necessary to create a new user story within the corresponding epic or feature to visualize it in the assigned team’s backlog.
To Convert a Feature into an Epic: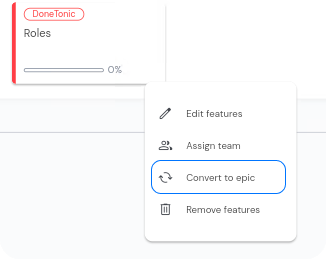
You can also convert a Feature into an Epic. By clicking on the three dots icon of the feature, you can select the option to convert it into an epic.
In this case, an Epic and a feature will be created below with the same title, description, and attached files as the original feature.
User story Mapping
“User Story Mapping” is a technique used in Agile that helps visualize and plan the development of a product or project as a whole. It consists of a visual map of “user stories,” which are descriptions of the functionalities or features that users want to see in the product.
In User Story Mapping, cards are used to represent epics, features, or characteristics, and user stories. These cards are organized on a board or whiteboard, following a logical flow that reflects the user experience. The goal is to create a visual representation of user stories that aids in understanding how they relate to each other and fit into the project’s context.
The benefits of User Story Mapping include:
- Providing a clear and shared vision of the project for the teams.
- Facilitating the prioritization of user stories, identifying what needs to be developed first.
- Identifying gaps or unmet needs in the project.
- Planning sprints and releases more effectively.
- Being useful for planning releases and communicating project progress to stakeholders.
- Allowing for scalability in agile projects. Scalability in agile refers to the implementation of agile practices in larger projects or companies where multiple teams work together on a larger product or project.
In summary, User Story Mapping is a tool that promotes collaboration, understanding, and planning in agile teams, leading to user-centered software development and effective delivery of features.
How is a User Story Mapping structured?
- Product: The term “product” refers to the software or application in development that will be used by end users.
- Epic: An “epic” is a unit of work representing a high-level functionality or feature in the product, which is often broken down into smaller features. For example, if you’re developing an application, an epic could be “Payment Process.”
- Feature: A “feature” is a specific functionality within an epic. Features are more detailed than epics and represent an identifiable and useful part of the product. Following the previous example, a feature related to the “Payment Process” epic could be “Credit Card Payment.”
- User Story: A user story is a description of a specific functionality from the user’s perspective. They are usually concise and follow a simple format: “As a [user type], I want to [perform an action] to [achieve a goal].” For example, “As a customer, I want to add products to my shopping cart to purchase multiple items at once.
How do I start with User Story Mapping?
Next, we’ll explain step by step how to start with User Story Mapping in DoneTonic:
Step 1: Creating Your First Product
- Start by creating your first product.
- Assign it a name, and, if necessary, a description.
- You can also choose the color that will identify this product, as it will be useful later on.
Step 2: Creating Epics with Their Respective Features
- Continue by creating epics along with their corresponding features.
- Here, you can also assign a color that identifies the epic or the features.
- The priorities of epics and features are managed from right to left, with the elements on the right having higher priority.
Step 3: Adding the Corresponding User Stories
- Add the user stories that correspond to each epic and feature.
- User story priorities are managed from top to bottom, with the user stories at the top having higher priority.
Assigning Work to Your Teams
Once you are clear about the work to be done, it’s time to define who will be responsible for it. You can assign an entire epic, a complete feature, or a user story to a specific team by following these steps:
Click on the three-dot button on the element you wish to assign. Select “Assign to Team.”
Once you have completed this work assignment for each team, you will be able to see the user stories represented as PBIs (Product Backlog Items) in the respective backlogs of each team.
It’s important to note that if you assign an epic or a feature to a team, all the user stories contained within these elements will be automatically assigned to the same team.
If you want to assign one of these user stories to another team, you just need to click on the team button and make the change.
Step 5: Creating a Release from the User Story Mapping
Once you have defined what work will be carried out and who will be responsible for it, it is crucial to establish when the work will be delivered. For this purpose, releases are used. You can create a release directly from the User Story Mapping and assign the user stories that will be delivered on the implementation date of that release.
Creating a release is a straightforward process. Follow these steps:
- Go to the “Unplanned” section and click on the button located in the top left corner, labeled “+ Release.”
- Assign a name to the release and specify the estimated delivery date.
- Once created, you can drag the user stories that will be part of this release.
This process allows you to plan and organize your project deliveries, ensuring effective management of time and resources.
User Story/User Story and PBIs:
As mentioned earlier, once you assign a User Story to a Team, it will be reflected as a PBI in the Team’s Backlog. Furthermore, when you start working on the PBI, any changes in its status, estimation, or label will be reflected in the User Story.
View of User Story as a PBI in the Backlog:
The color label on the left indicates which Product this PBI corresponds to, making it easy to visualize your work. The User Story Mapping icon allows you to see which Product, Epic, and Feature this PBI belongs to.
In the event that the situation is reversed, and you want to add a PBI to a User Story Mapping, you can do so by clicking on the User Story Mapping icon of the PBI and specifying in which Epic and Feature you want to place it.
How can I know the status of each epic and each feature?
If you want to know how progress is being made on an epic or a feature, you just have to look at its respective progress bar, which indicates how much has been completed and how much is left to finish the epic or feature.
By hovering over the progress bar, you can get detailed information about the states of its user stories.
Now you may wonder how DoneTonic calculates the progress of an epic or a feature. It’s very simple:
Depending on the case, the following parameters are taken into account: Status of the stories and/or estimation of each story:
- If all stories have an estimation, progress is calculated based on the estimation.
- If you don’t work with estimation, progress is calculated based on the status of the stories. Interpreting the stories in DONE as completed.
- If some stories have estimation and others don’t, an average estimation is taken for the non-estimated stories. This is calculated by summing the estimations of all stories and taking an average.
Views in User Story Mapping:
It often happens that the User Story Mapping becomes a very extensive map, and perhaps you want to see the information more condensed.
For this, you have various view options for User Story Mapping. In the top bar on the right, you can:
Compact the view: Where the entire map will be compressed, leaving only the titles of the elements visible. Collapse epics: Where all epics will collapse, displaying the progress bar and the number of elements contained in each epic.
Compacted View:
View with collapsed epics:
If you want to collapse only one epic, you have to click on the arrow located in the upper right corner: